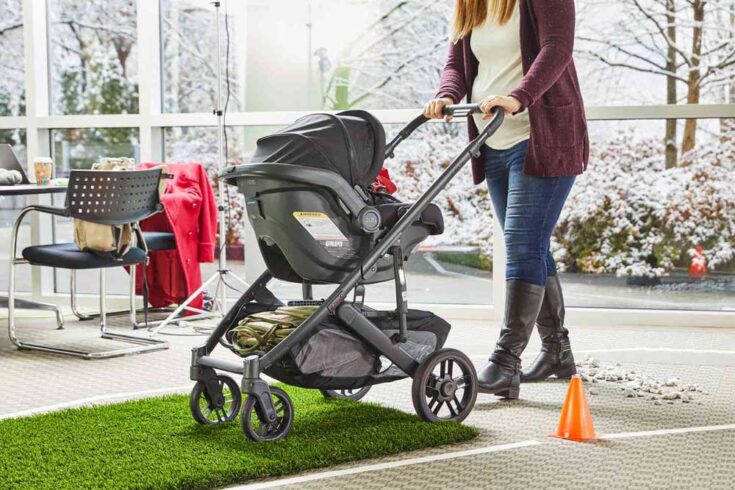
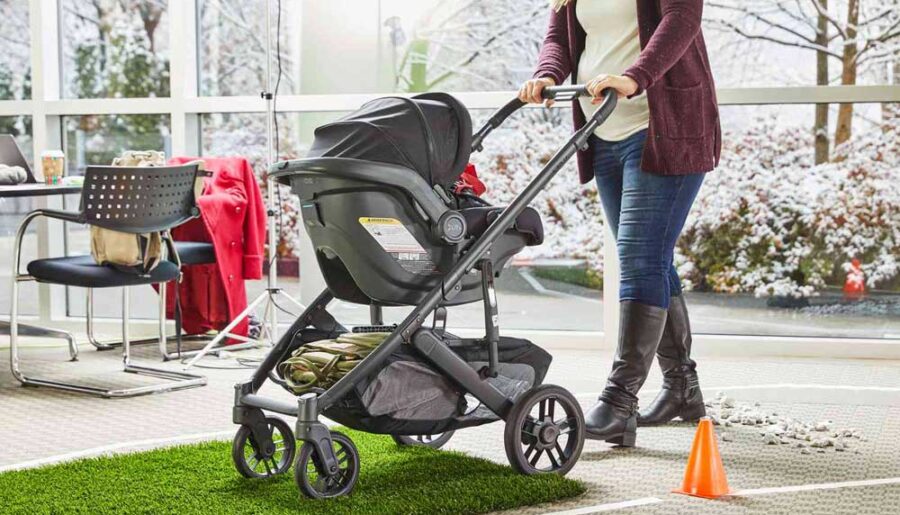
When we moved to New Hampshire back in October, we knew we were in for a different lifestyle than we’ve had before. There’s septic systems, well water, icy roads that stay icy because they only use sand, and a slew of other things that we’ve never had to deal with before. Aside from having anxiety attacks at driving up or down extremely icy driveways with no 4 wheel-drive, and actually sliding backwards (yes, this just happened last week. Then again yesterday. I think I’m going to have to go to counseling, as I obviously have issues over it), the adjustments have been fairly smooth and we’ve so enjoyed our new lives here.

Emma, our nearly 11-year old daughter, is having a blast playing in our big yard, making lots of friends and doing various activities. She’s been taking Tae Kwon Do lessons and continuing her harp lessons, and is busy with Girl Scouts. She’s wanted to get involved with 4H, and the other day when a friend emailed me that there was a new 4H group starting up, Emma decided it’d be fun to go to the meeting and check it out.

The focus of the group? Pygmy goats.

Source

Yeah. How can you say no to that, right? Knowing nothing about pygmy goats, or any goats for that matter, we headed to the 4H meeting last night. We learned that pygmies are very much like dogs, and that Emma will need to learn to train them for showing. The goats aren’t used to walking on a leash, and Emma will have to get them ready to do so for the county fair in September. Not only that, but one of the girls there who already has a pygmy tried to train it to walk in the ring last year, and it wasn’t too fond of doing so, so in the middle of the show it stopped, fell over and played dead. Training a pygmy is a little more difficult than one would think, apparently.

Fortunately, we don’t have to own a goat in order for Emma to participate. She’s able to lease a goat, take care of it and do all the wonderful things of ownership without actually having it on our property and dealing with 2 crazy dogs who’d probably try to play with the goat.

I’m looking forward to sharing some of our goat stories as this new adventure begins!

Share
 

It’s been chilly and dreary here, making for the perfect opportunity to stay home, snuggle up under a blanket near the pellet stove and read. It’s also just the right time to make steaming hot bowls of soup for dinner.

This recipe for Salmon Chowder is one of my family’s favorites:

Salmon Chowder

Ingredients:

1 clove garlic, minced
1/2 c. chopped celery
2 T. butter
2 c. chicken broth
1 c. chopped potatoes
1 c. sliced carrots
1/2 t. dill
1/2 t. salt
1/4 t. pepper
1 12oz can evaporated milk
1 c. frozen corn (can substitute with 1 8oz can cream-style corn for a creamier soup)
1 7.5oz can salmon, drained, flaked, skinned & bones removed

In large pan, cook celery & garlic in hot butter until tender. Stir in broth, potato, carrot, dill, salt & pepper. Bring to a boil, then reduce heat. Cover and simmer for 20 minutes or until veggies are tender. Stir in milk, corn & salmon, then heat through. Makes 4 servings.

Share
 

Some of you may remember that I suffer from a slew of food allergies and intolerances, and that my diet is extremely limited. In addition to the biggies, like dairy, eggs, corn, gluten, I also have allergies and intolerances to things like onions, rice, broccoli, cauliflower, and a huge, exhaustive list of other foods.

Sorghum is one of the few “safe” foods that I have, and while it’s taken quite a lot of patience and experimentation, I’m slowly developing recipes that are at least acceptable. And you’ll find when your diet is severely restricted that “acceptable” is very subjective :)

Last week as I was googling away and looking for more sorghum recipes to tweak, I stumbled across something I knew I had to try: sorghum “popcorn” from Just Poppin’! Since being diagnosed with a corn allergy a few years ago, I’d not touched anything with corn in it. Going to the movies just wasn’t the same. I ordered a few pounds to try it out.

Well, it came yesterday:

The website says that, since the grains are so small, they don’t work in most air poppers, so I got to work right away trying to make some on the stove. I put some grapeseed oil in a pan and added the grains. Guess what started happening?!

The website also states that only around 60 to 70% of the grains actually pop. In my two times doing this yesterday, I’d say my number was closer to the 60% estimate. And once it’s popped, it’s pretty small:

But for not having had any sort of “popped” food for several years, I’ll take it! This is a great corn-free option for those of us who cannot eat corn, and is something that I’m going to continue to use.


Disclaimer: I was not compensated in any way for this review. I have so many food allergies and intolerances that I simply wanted to share something that I found helpful and tasty!

Share
 

I’m all about avoiding chemicals wherever I can. I use natural, non-toxic cleaners in the house, and lately I’ve been trying to figure out how to make a natural air freshener for the bathrooms. I’ve seen some tutorials on creating essential oil reed diffusers, but they required items I didn’t have around the house, and I didn’t want to spend a lot of money on this project. So I turned to my faithful baking soda, my lovely, non-toxic baking soda that has served me so well for so many years in keeping a clean home.

I love that baking soda removes odors naturally. And really well. Just ask my mom, who had a skunk living under her house for a few days and couldn’t get the stink out. She finally opened several boxes of baking soda and the smell was gone within 2 days. Naturally, I thought baking soda might be a good place to start with my air freshener.

I’d need a place to put the baking soda, and I wanted it to be somewhat attractive, so I went back to the idea I used for my glitter glue snowflake project and used Elmer’s Glue and food coloring to make a glaze to put on a mason jar. Here’s what you’ll need:

1 mason jar (I used the small ones)
Elmer’s Glue-All or School Glue
food coloring
spongebrush

I put some of the Elmer’s Glue on a paper plate, then added a few drops of food coloring and mixed it together.

I took the spongebrush and applied a liberal coat onto the mason jar.

I let this dry and then I took the mason jar lid and punched some holes in it using a nail and hammer.

I put some baking soda in the jar, and mixed some dried lavender I had around the house so it’d not only absorb odors, but smell pretty too.

Share
 

Happy New Year! I hope your 2012 is off to an amazing start. We had a wonderful holiday – my mom came to visit from Arizona, and I loved having her here. We had the best Christmas ever, and we are excited to see where 2012 leads us.

I wanted to have my first blog post of the year focus a bit on goals I want to reach this year, so here we go!

1. Replace half bath toilet. It’s old, beige and wobbles. We’ve never replaced an entire toilet before, but I’m hoping there are some YouTube videos about it.

2. Re-do half bath. See that counter? Blech. And the cabinets? I’d like to try my hand at painting them, and thought this small area might be a good starting point. That way, if I really mess it up, it wouldn’t cost a whole lot to replace.

3. Replace kitchen floor. This is a big goal, and I’m not entirely sure we’ll be able to accomplish it. I hate, hate, hate the floor. This is how it looks after I’ve cleaned, scrubbed, steamed, and scrubbed some more. I think it started out white.

It’s original to the house, and the house is 21 years old. That should give you an idea how much grime is on there. I haven’t figured out what kind of flooring to replace it with – we have hardwoods everywhere else on the first floor, but I’m not sure I want hardwood in the kitchen. We were thinking tile, but we heard it’s really tricky to install and you have to worry about cracking and laying it on flat surfaces. I’m open to suggestions if you have any!

4. Paint. One of these things is not like the other. Notice the streaks? Drives. me. crazy. Not quite sure what whoever painted this was thinking – “Oh, no one will notice this slightly off color that doesn’t quite match the original” – ? Anyway, I’d love to paint most of the downstairs, but again, I’m not sure that we’ll reach this goal entirely.

5. Remove this board/room divider/whatever the heck it is. I have NO idea the original intent for this piece of trim in the middle of the wall:

Room divider? It just doesn’t make sense and I really dislike it. I would love to remove it, but I’m worried about damaging the wall. Any suggestions on this one?

6. Start an heirloom garden. I want to grow as much food for us to eat as possible, and want to use heirloom & organic seeds. I started reading Organic Gardening for Dummies, and wow, there’s a lot to learn. Hopefully we can get this started, at least on a small scale.


I have a lot more that I’d like to accomplish, but I’m trying to keep the list reasonable. I’m sure I’ll be tweaking it as the year progresses. And I’m sure I’ll need advice & suggestions along the way, so if you have anything to share or any been there, done that, stories, I’d love to hear them!

Share
 

Have you seen those mug brownie recipes all over Pinterest? I think there’s a little bit of drool over my laptop from looking at them.

via Amber Withrow on Pinterest

via Liz O'Donoghue on Pinterest

I love that it takes only a few minutes till chocolately perfection is reached. Naturally, I had to try to figure this out for those of us who are gluten-free. You know, strictly research-based. Which means that all the calories I consumed in trying to come up with this recipe don’t count since they were for research purposes. The things I do in the name of my blog.

The Mom Hood's Gluten-free Mug Brownie Recipe

Ingredients:

4 tablespoons sorghum flour
4 tablespoons sugar (I’ve tried this with brown sugar, and found that about 1.5 to 2 Tbsp also makes a good brownie)
2 tablespoons cocoa powder
2 tablespoons grapeseed oil
2 tablespoons water

Mix everything together in a microwavable mug. Microwave for 1 – 1 1/2 minutes, depending on power of your microwave. I found I need around 1:25 to just get it right. Let cool and enjoy!


Shared at:
The Gluten-Free Homemaker
Share
 

I was recently given the opportunity to try Loving Pets Barksters Holistic Dog Treats out with our two dogs. We have a family member who is big into all natural, wheat-free diets for her dogs, and I thought this would be a good opportunity to try out a wheat-free, gluten-free treat.

One of the things that stuck out immediately about the product is that it has no additives or preservatives, and I could understand all the ingredients on the labels. The Brown Rice & Beef Crisps ingredients were: brown rice, rice flour, beef and rice bran oil, and the Sweet Potato & Chicken Krisps ingredients were sweet potato, rice flour, chicken and rice brain oil.

In addition to the all-natural ingredients, the treats are only 12 calories per treat, and low in fat. Our dogs loved them, and I liked that they were a healthy alternative to the usual treats that we give.


Disclosure: I was given 2 boxes of Loving Pets Barksters treats in exchange for my honest opinion. All opinions are my own

Share
 

Since the Sunbutter cookies I posted the other day only lasted a day didn’t last long, I decided to try my hand at some allergen-free buckeyes. Buckeyes are a tradition in my family, and perhaps because I was born & raised in Ohio, it’s kind necessary for me to make them every holiday. Having multiple food allergies can be a challenge when baking, but this recipe turned out might good!

Buckeyes
3/4 cup Sunbutter
1/2 cup butter substitute, softened (I used Earth Balance)
1/4 teaspoon vanilla extract
3 cups powdered sugar (I made my own using my Blendtec since I have a corn allergy)
2 cups Enjoy Life chocolate chips

In a bowl, mix Sunbutter, butter substitute, vanilla & powdered sugar. The dough will seem really dry, but that’s ok – that’s the way it should be. Roll into balls and place on a parchment-lined or wax paper-lined cookie sheet. Insert toothpick into balls (this will help with dipping into the chocolate later) and put cookie sheet in the freezer for around an hour.

Melt Enjoy Life chocolate chips in microwave-safe bowl in increments of 15 seconds. Stir after every 15 seconds, until fully melted. Take frozen Sunbutter balls and dip into melted chocolate, then put on lined cookie sheet and refrigerate to harden chocolate.

This made about 25 golf-ball sized Buckeyes for me. I’m whipping up another batch today, because those 3 that are in the picture are about all that’s left. Darned house elves.

Share
 

In my family, the holidays mean one thing: baking. Yes, there are gifts, time with family, and all that, but the main event? Cookies. And not just one or two different kinds. Oh, no. When I was a child, my mom would make a minimum of 15 different kinds. We ran out of room in the house for them, so she’d put them in the garage. Seriously. When I grew up, I enjoyed all that holiday baking, too, and one year maxed out at 50 kinds of cookies. Insane, I know. But oh, so good. To say my clothing didn’t fit after Christmas is an understatement.

A few years ago, when I became gluten intolerant, I had a hard time with the holidays. It’s not the same to make cookies without gluten, goshdarnit. I tried rice flour mixes, and they were ok. And then I developed an intolerance to rice flour. Hm. Where do you go from there? Many of the gluten-free mixes have rice flour in them. But there are a few recipes that don’t call for any flour, and here’s one of my favorites that is so easy to make. Only 3 ingredients and about 10 minutes!

Gluten-free Sunbutter cookies (or Gluten-free Peanut Butter cookies if you can tolerate peanuts):

1 cup Sunbutter (or peanut butter)
1 egg (I use Ener-G egg replacer since I’m allergic to eggs)
1 cup sugar

You still with me? I told you this was easy! Mix all ingredients in a bowl. Bake at 350 degrees for 8-10 minutes, until bottoms are golden. Cool on wire rack.


Shared at:

The Gluten-Free Homemaker

Allergy-free Cookery

Share
 

This year I’m big into making our own holiday decor and doing things as frugally as possible (like with my Pottery Barn knock-off acorns). So when I saw Ballard Designs’ Suzanne Kasler Iced Pinecone Ornaments for $15, I knew I could make those puppies for way cheaper.

Here’s the Ballard version:

Image courtesty BallardDesigns.com

I ran out to the yard, grabbed up all the pinecones I could find and stated on my project.

Supplies:

Pinecones
Paintbrush
Elmer’s Glue-All
Epsom salt

I started by baking the pinecones at 175 degrees for a few hours, just to kill any buggies that might have made a home in there. Once they were cool, I took a paintbrush and applied Elmer’s Glue-All.

Once the glue was applied where I wanted, I went ahead and sprinkled some Epsom salt over it.

And sprinkled some more on, all around it.

I let it dry on wax paper and I think they turned out great!

Ballard had these as ornaments, but I’m going to put them in a big glass bowl and leave them as a centerpiece. The cost? Free to me, since I had the Epsom salt from gifts we made, and the Glue-All is a staple in our house.

Pin It

Related Posts Plugin for WordPress, Blogger...
Share